Installing Windows Small Business Server 2011 Standard Part 1
January 9, 2011 2 Comments
Windows Small Business Server 2011 Standard has just been released to manufacturing, and is available through Technet and MSDN Subscriptions if your lucky enough to have one; I am, so what follows is my documented installation procedure for SBS 2011.
A couple of things to note before we start, the download from MSDN is over 6gb (just for disc 1) you’re going to need a DUAL LAYER DVD/RW to write this ISO to a DVD – or like me – use Hyper-V to install.
Once you have the Disc or ISO ready, I guess we need to check the Hardware Requirements?
You might want to review the latest info here on the release notes : Technet/SBS
At the time of writing the following is correct:
Processor: Quad core 2 GHz 64-bit (x64) or faster / 1 socket (4 sockets maximum)
Physical memory (RAM): 8 GB Minimum / 10 GB recommended (32 GB maximum)
Storage capacity: 120 GB
DVD ROM drive
Network adapter: One 10/100 Ethernet adapter
Monitor and video adapter: Super VGA (SVGA) monitor and video adapter with 1024 x 768 or higher resolution
Network devices: A router or firewall device that supports IPv4 NAT
Internet connection: Windows SBS 2011 Standard requires that you connect the server to the Internet.
Optional network devices:
1.Device required by your Internet service provider (ISP) to connect to the Internet
2.One or more switches to connect computers and other devices to the local network
Fax modem : Fax services require a fax modem
All set?
Do you have a RAID Controller in your system – Get the drivers now! Download them to a USB pen drive or Floppy disk and have them ready.
What i am not going to cover is how you set your system to boot from the dvd in the bios, or other methods of install like creating a bootable USB pen (very cool deployment method) and then also setting the bios to boot from USB. You can find more info on USB booting on the page i use every time i need to do it, here… Method 6 being my preferred option. Of course in Hyper-V we can just use the ISO which is much more convenient.
Edit – A Fellow MVP and Friend of Mine – Tim Barrett has jumped on the bandwagon and posted a great article about how to make a usb boot disc for SBS 2011 check it out here at NoGeekLeftBehind.com
So whatever your chosen media and boot options, let’s put the ‘disc’ and fire up our server.
You will need to press the ANY key to boot from your DVD, if you cant find it, just press ENTER ![]()
You’ll see a screen flash through where windows loads files from the media, and then a screen that looks like the Windows 7 start up splash screen (don’t worry you haven’t downloaded the wrong ISO (well you MAY have done, but you’ll see this on both SBS 2011, and Windows 7)
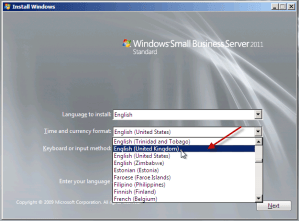
Our first look up at the setup screen will remind a lot of us of the Vista/2008 era setup screens, we will need to choose the installation language, and confirm your selection.
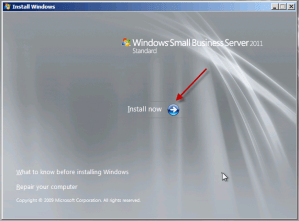
We only have one option now which is to install. You may want to review the ‘what to know before installing windows’ section, now is your chance.
Setup will now begin…
You will need to review and agree to the license agreement. Note – I’m not telling you to agree to it, you need to READ IT and accept the terms for yourself!
Agreed? Great, lets move on.
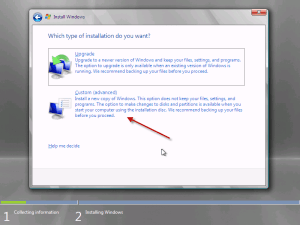
You will need to select whether you want an Upgrade or Custom Install. I haven’t actually tested to see what happens if you click Upgrade – suffice to say an upgrade is not a supported migration path from any version of Windows. I am doing a new clean install, so i am selecting Custom.
With any luck setup will auto detect your hard drive. Those using a raid controller may need to install controller drivers at this point.
You can see the load driver option highlighted here, you will just need to browse for the files on your USB drive or floppy disk and install them, once done your disk(s) will appear.
Since i have only one hard drive and i don’t want to do any partitioning, i am going to format this disk and use the full capacity.
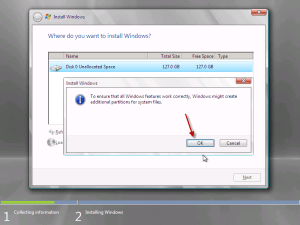
Setup will flag up a warning about partitioning the drive, so that all windows features work correctly. This will also partition a small area of disk (about 100mb) that is reserved for use with BitLocker, it also hosts the Boot loader and Windows PE files.
Ok, now that are disk is formatted, we need to move on.
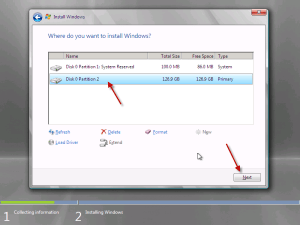
Select the partition you wish you wish to install onto, in my case Disk 0 Partition 2, and click on to Next.
Continued in Part 2








Hello Robert
This is my first attempt at Small Business Server 2011 and have a couple of questions if that is ok with you, I only wanted Server 2008 standard for SQL as a collegue is working with SQL developing databases for another collegue, I was told that I needed to go to Small Business Server 2011 standard and Small Business Server 2011 Premium Add-on to get the SQL as well, so this is what I have done.
1. I have installed Small Business Server 2011 Standard successfully and also activated and downloaded all updates and service packs. manually changed the DNS to my router and all is working ok, I do not understand why I needed to buy the Small Business Server 2011 Premium Add-on as the SQL seems to be part of Small Business Server 2011 standard.
2. Is the Small Business Server 2011 Premium Add-on only for extra licensing?
3. If so how do I add the licenses.?
Hi Frank.
Firstly, when someone says ‘i only wanted server 2008 standard’ alarm bells ring for me. Only because i want to see people buying the right software, for the right job.
So, to answer your questions, i have to assume a few things such as how many users you have. Ill stick to 5 as it is easier. I may also be mis-understanding you so feel free to correct me.
You needed SQL for some development work, so you purchased SBS 2011 + 1 PAO (Premium Addon)
I did some brief calculations and based on 5 users, and buying Server 2008 R2 + SQL 2008 R2 Standard + SQL Licenses, comes out more expensive, than buying SBS 2011 + 1x PAO.
When you say, manually changed the DNS to your router, can you be a little more specific about what you did there?
The SBS Premium Addon (PAO) offers more than just licensing. It gives you a second full copy of Server 2008 R2 Standard, A Full copy of SQL 2008 R2 Small Business (which is Standard renamed to be packaged with the PAO), With that you can take advantage of things like 1+1 Server Licensing to use Hyper-V to virtualise your environment.
I have a post on SBS 2011 Licensing here http://titlerequired.com/2011/07/26/how-to-install-sbs-2011-cals/